Python login form with PyQt - User authentication
Write a Python program to create a login form that accepts username and password and validates them. Use the PyQt5 module.
From doc.qt.io:
QApplication Class: The QApplication class manages the GUI application's control flow and main settings.
QMainWindow Class: The QMainWindow class provides a main application window.
QWidget Class: The QWidget class is the base class of all user interface objects
QFormLayout Class: The QFormLayout class manages forms of input widgets and their associated labels
QLabel Class: The QLabel widget provides a text or image display.
QLineEdit Class: The QLineEdit widget is a one-line text editor.
QPushButton Class: The QPushButton widget provides a command button.
QMessageBox Class: The QMessageBox class provides a modal dialog for informing the user or for asking the user a question and receiving an answer.
Sample Solution:
Python Code:
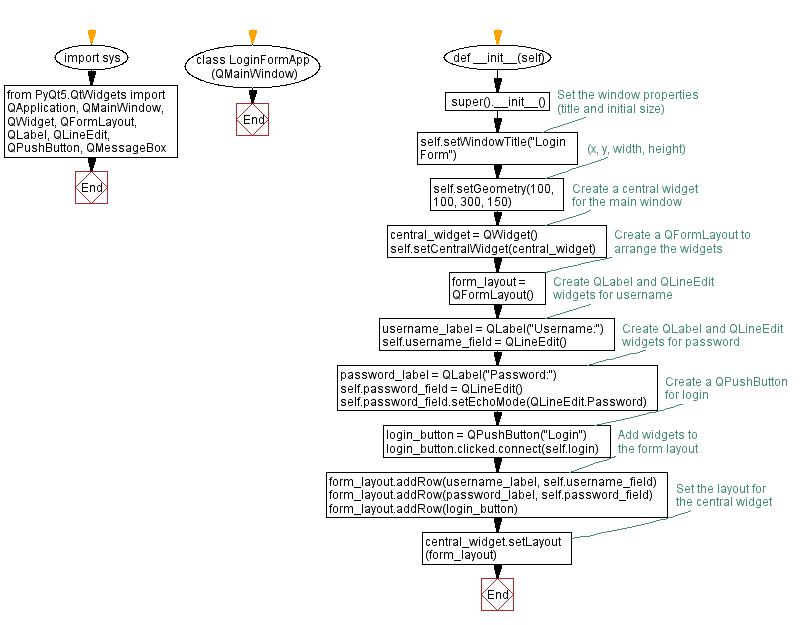
import sys
from PyQt5.QtWidgets import QApplication, QMainWindow, QWidget, QFormLayout, QLabel, QLineEdit, QPushButton, QMessageBox
class LoginFormApp(QMainWindow):
def __init__(self):
super().__init__()
# Set the window properties (title and initial size)
self.setWindowTitle("Login Form")
self.setGeometry(100, 100, 300, 150) # (x, y, width, height)
# Create a central widget for the main window
central_widget = QWidget()
self.setCentralWidget(central_widget)
# Create a QFormLayout to arrange the widgets
form_layout = QFormLayout()
# Create QLabel and QLineEdit widgets for username
username_label = QLabel("Username:")
self.username_field = QLineEdit()
# Create QLabel and QLineEdit widgets for password
password_label = QLabel("Password:")
self.password_field = QLineEdit()
self.password_field.setEchoMode(QLineEdit.Password)
# Create a QPushButton for login
login_button = QPushButton("Login")
login_button.clicked.connect(self.login)
# Add widgets to the form layout
form_layout.addRow(username_label, self.username_field)
form_layout.addRow(password_label, self.password_field)
form_layout.addRow(login_button)
# Set the layout for the central widget
central_widget.setLayout(form_layout)
def login(self):
# Retrieve the username and password entered by the user
username = self.username_field.text()
password = self.password_field.text()
# Check if the username and password are valid (for demonstration purposes)
if username == "admin" and password == "pass123$":
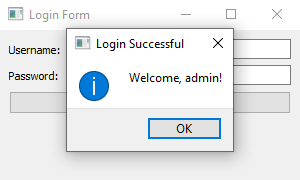
QMessageBox.information(self, "Login Successful", "Welcome, " + username + "!")
else:
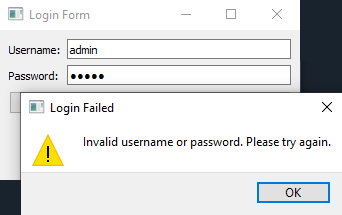
QMessageBox.warning(self, "Login Failed", "Invalid username or password. Please try again.")
def main():
app = QApplication(sys.argv)
window = LoginFormApp()
window.show()
sys.exit(app.exec_())
if __name__ == "__main__":
main()
Explanation:
In the exercise above -
- Import the necessary modules.
- Create a "QMainWindow" named "LoginFormApp" with a central widget.
- Set the window's title and initial size.
- Create a "QFormLayout" named form_layout to arrange the widgets neatly.
- Create a 'QLabel' and 'QLineEdit' widgets for username and password input fields. We also created a "QPushButton" for login.
- The password field is set to echo mode QLineEdit.Password to hide a password.
- Connect the login method to the "Login" button's click event, which handles the login process.
- In the login method, we retrieve the user's username and password and validate them. For demonstration purposes, we use hardcoded credentials.
- If the credentials are valid, a success message is displayed using 'QMessageBox.information'. Otherwise, an error message is displayed using 'QMessageBox.warning'.
- In the main function, we create the PyQt application, create an instance of the "LoginFormApp" class, show the window, and run the application's event loop.
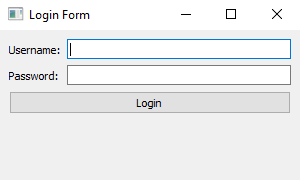
Output:
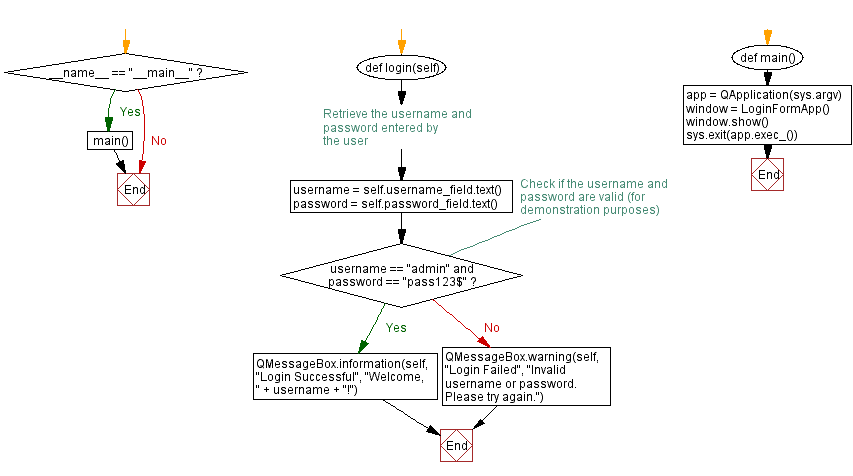
Flowchart:
Go to:
Previous: Temperature converter.
Next: Button grid.
Python Code Editor:
What is the difficulty level of this exercise?
Test your Programming skills with w3resource's quiz.