Python numeric keypad with PyQt - Button grid
Write a Python program to create push buttons in a grid where each button represents a numeric keypad. Use PyQt module.
From doc.qt.io:
QApplication Class: The QApplication class manages the GUI application's control flow and main settings.
QMainWindow Class: The QMainWindow class provides a main application window.
QWidget Class: The QWidget class is the base class of all user interface objects.
QGridLayout Class: The QGridLayout class lays out widgets in a grid.
QPushButton Class: The QPushButton widget provides a command button.
Sample Solution:
Python Code:
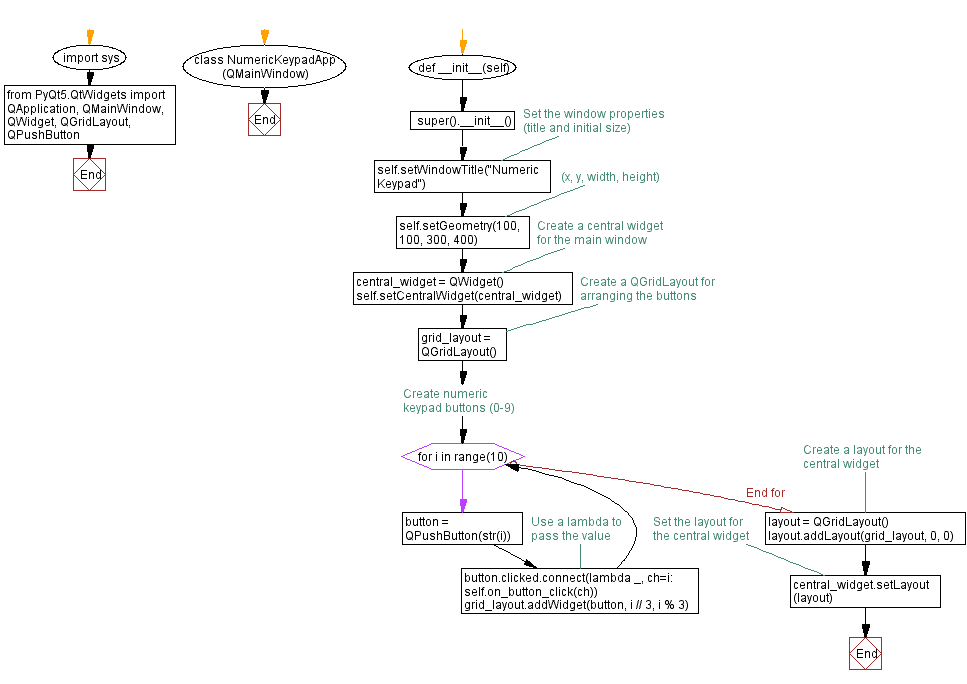
import sys
from PyQt5.QtWidgets import QApplication, QMainWindow, QWidget, QGridLayout, QPushButton
class NumericKeypadApp(QMainWindow):
def __init__(self):
super().__init__()
# Set the window properties (title and initial size)
self.setWindowTitle("Numeric Keypad")
self.setGeometry(100, 100, 300, 400) # (x, y, width, height)
# Create a central widget for the main window
central_widget = QWidget()
self.setCentralWidget(central_widget)
# Create a QGridLayout for arranging the buttons
grid_layout = QGridLayout()
# Create numeric keypad buttons (0-9)
for i in range(10):
button = QPushButton(str(i))
button.clicked.connect(lambda _, ch=i: self.on_button_click(ch)) # Use a lambda to pass the value
grid_layout.addWidget(button, i // 3, i % 3)
# Create a layout for the central widget
layout = QGridLayout()
layout.addLayout(grid_layout, 0, 0)
# Set the layout for the central widget
central_widget.setLayout(layout)
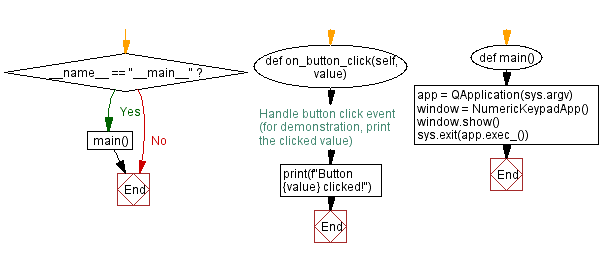
def on_button_click(self, value):
# Handle button click event (for demonstration, print the clicked value)
print(f"Button {value} clicked!")
def main():
app = QApplication(sys.argv)
window = NumericKeypadApp()
window.show()
sys.exit(app.exec_())
if __name__ == "__main__":
main()
Explanation:
In the exercise above -
- Import the necessary modules.
- Create a "QMainWindow" named "NumericKeypadApp" with a central widget.
- Set the window's title and initial size.
- Create a "QGridLayout" named grid_layout to arrange the numeric keypad buttons in a grid.
- Create numeric keypad buttons (0-9) in a loop and connect their click events to the on_button_click method, passing the button's value as an argument.
- The "on_button_click()" method handles button click events. For demonstration purposes, it prints the clicked value.
- Arrange the numeric keypad buttons using the "QGridLayout".
- In the main function, we create the PyQt application, create an instance of the "NumericKeypadApp" class, show the window, and run the application's event loop.
Output:
Button 7 clicked!
Button 1 clicked!
Button 0 clicked!
Button 1 clicked!
Button 5 clicked!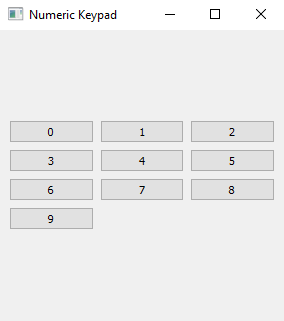
Flowchart:
Go to:
Previous: User authentication.
Next: Messaging interface.
Python Code Editor:
What is the difficulty level of this exercise?
Test your Programming skills with w3resource's quiz.