JavaFX Honeycomb layout design
Write a JavaFX layout that displays elements in a honeycomb pattern.
Sample Solution:
JavaFx Code:
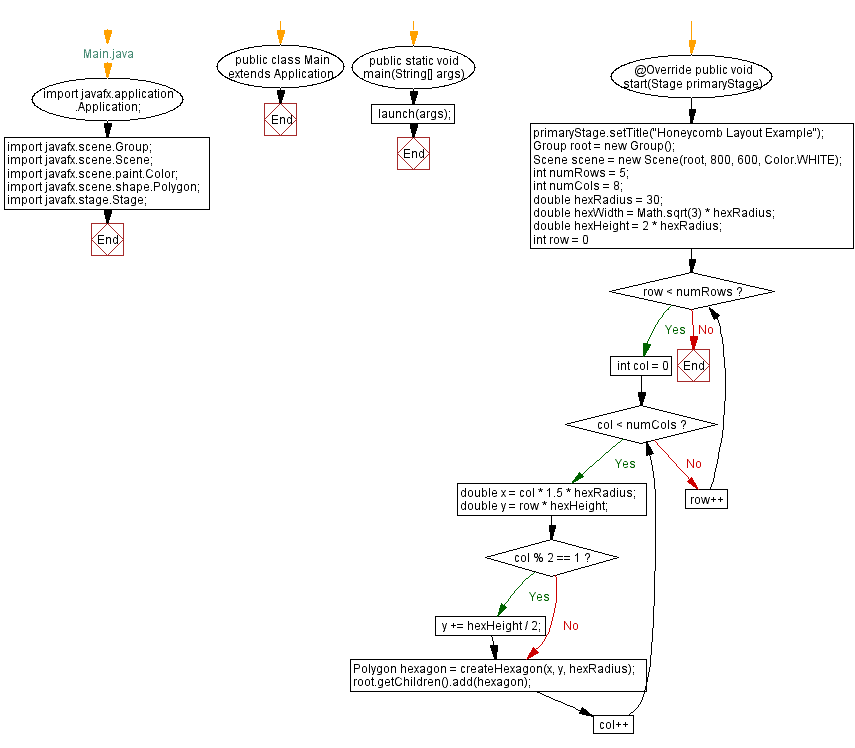
//Main.java
import javafx.application.Application;
import javafx.scene.Group;
import javafx.scene.Scene;
import javafx.scene.paint.Color;
import javafx.scene.shape.Polygon;
import javafx.stage.Stage;
public class Main extends Application {
public static void main(String[] args) {
launch(args);
}
@Override
public void start(Stage primaryStage) {
primaryStage.setTitle("Honeycomb Layout Example");
Group root = new Group();
Scene scene = new Scene(root, 800, 600, Color.WHITE);
int numRows = 5;
int numCols = 8;
double hexRadius = 30;
double hexWidth = Math.sqrt(3) * hexRadius;
double hexHeight = 2 * hexRadius;
for (int row = 0; row < numRows; row++) {
for (int col = 0; col < numCols; col++) {
double x = col * 1.5 * hexRadius;
double y = row * hexHeight;
if (col % 2 == 1) {
y += hexHeight / 2;
}
Polygon hexagon = createHexagon(x, y, hexRadius);
root.getChildren().add(hexagon);
}
}
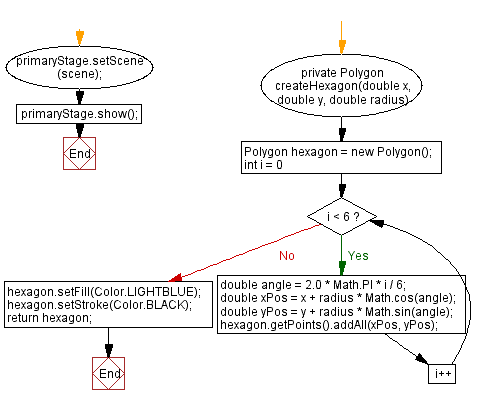
primaryStage.setScene(scene);
primaryStage.show();
}
private Polygon createHexagon(double x, double y, double radius) {
Polygon hexagon = new Polygon();
for (int i = 0; i < 6; i++) {
double angle = 2.0 * Math.PI * i / 6;
double xPos = x + radius * Math.cos(angle);
double yPos = y + radius * Math.sin(angle);
hexagon.getPoints().addAll(xPos, yPos);
}
hexagon.setFill(Color.LIGHTBLUE);
hexagon.setStroke(Color.BLACK);
return hexagon;
}
}
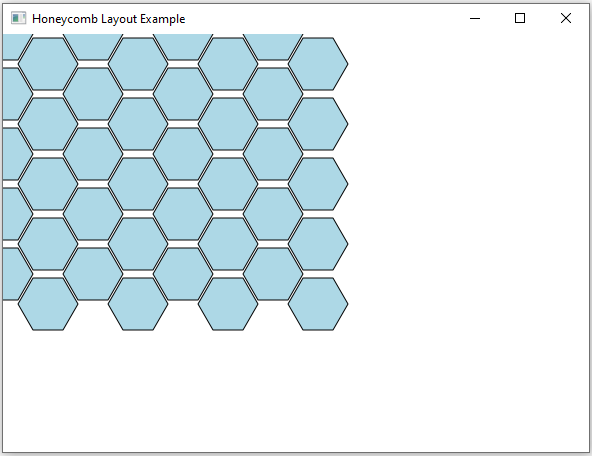
In the exercise above, we create hexagonal shapes using 'Polygon' and position them to form a honeycomb pattern. The "createHexagon()" method calculates the vertices of a hexagon, and we use a nested loop to position these hexagons in a honeycomb grid.
Note: Adjust the 'numRows', 'numCols', 'hexRadius', and other parameters to modify the layout.
Sample Output:
Flowchart:
Java Code Editor:
Previous: JavaFX Spiral layout design.
Next: JavaFX Image scroll with ScrollPane.
What is the difficulty level of this exercise?
Test your Programming skills with w3resource's quiz.